
Residential Siding Installation A Comprehensive Guide: Transforming your home’s exterior is a significant undertaking, but with the right knowledge and planning, it can be a rewarding experience. This guide dives into every aspect of residential siding installation, from choosing the perfect material to tackling those tricky corners. We’ll cover everything you need to know, whether you’re a seasoned DIYer or a complete beginner, ensuring your project is a success.
From understanding the different types of siding available – vinyl, wood, fiber cement, and metal – to mastering the installation techniques for each, this guide provides a step-by-step approach. We’ll equip you with the knowledge to create a beautiful and durable exterior that enhances your home’s curb appeal and protects it from the elements for years to come. We’ll also explore budgeting, safety, and common challenges, helping you navigate every stage of the process with confidence.
Introduction to Residential Siding Installation
Residential siding installation is the process of covering the exterior walls of a house with protective and aesthetically pleasing material. It’s a crucial aspect of home construction and renovation, offering significant benefits beyond just curb appeal. Proper siding protects your home’s structure from the elements, improving its longevity and energy efficiency.Siding installation involves careful planning, precise measurement, and skilled application to ensure a durable, weather-resistant, and visually appealing finish.
The entire process, from material selection to final installation, impacts the home’s overall value and appearance.
Types of Residential Siding Materials
Homeowners have a wide variety of siding materials to choose from, each with its own set of advantages and disadvantages. The selection process often involves balancing cost, durability, maintenance requirements, and aesthetic preferences.
- Vinyl Siding: A popular choice due to its affordability, low maintenance, and wide range of colors and styles. Vinyl is resistant to rot, insects, and moisture, but can be damaged by extreme temperatures and impact.
- Fiber Cement Siding: A durable and fire-resistant option that mimics the look of wood. Fiber cement requires more maintenance than vinyl but offers superior longevity and weather protection. It’s a more expensive option than vinyl.
- Wood Siding: A classic choice that offers a natural look and feel. Wood siding requires regular maintenance, including painting or staining, and is susceptible to rot, insect damage, and fire. However, it provides excellent insulation.
- Metal Siding: Highly durable and low-maintenance, metal siding (aluminum or steel) is resistant to fire, insects, and rot. It’s also energy-efficient, reflecting sunlight and reducing heat gain. However, it can be susceptible to dents and may be noisy during rain.
- Brick Siding: Offers exceptional durability, fire resistance, and insulation. It requires minimal maintenance and provides a classic, timeless look. However, it is a more expensive option and requires professional installation.
Factors Influencing Siding Material Selection
Choosing the right siding material involves careful consideration of several key factors. These factors often interact, requiring homeowners to balance competing priorities.
- Budget: Vinyl siding is generally the most affordable option, while brick and fiber cement are at the higher end of the price spectrum. The cost also varies depending on the complexity of the installation.
- Climate: In areas with harsh winters, materials with good insulation properties, like fiber cement or wood, might be preferable. In hot, sunny climates, materials that reflect sunlight, such as metal siding, can help keep the house cool.
- Aesthetics: Homeowners often choose siding based on its appearance and how it complements the overall architectural style of their home. The wide range of colors, textures, and styles available allows for considerable personalization.
- Maintenance Requirements: Some siding materials, like vinyl, require minimal maintenance, while others, like wood, need regular painting or staining to prevent damage. This is a significant factor to consider based on the homeowner’s time and resources.
- Durability and Longevity: Materials like fiber cement and metal offer superior durability and longevity compared to vinyl or wood. The long-term cost implications of each material should be considered.
Planning and Preparation for Siding Installation
Proper planning and preparation are crucial for a successful siding installation. Overlooking these steps can lead to delays, increased costs, and a less-than-perfect final product. Careful attention to detail in this phase will save time and effort later on.
This section details the necessary steps for preparing your exterior walls and Artikels a typical project timeline and required tools. Understanding these elements will significantly contribute to a smooth and efficient siding installation.
Exterior Wall Preparation Checklist
Before installing new siding, it’s essential to thoroughly prepare the existing exterior walls. This involves several key steps that ensure the longevity and aesthetic appeal of the final installation.
- Inspect and Repair Existing Siding (if applicable): Assess the condition of any existing siding. Repair or replace damaged sections, addressing rot, cracks, or loose boards. This prevents problems from affecting the new siding.
- Remove Old Siding and Trim: Carefully remove any old siding, ensuring you don’t damage the underlying structure. Dispose of materials responsibly according to local regulations. This creates a clean surface for the new installation.
- Clean the Exterior Walls: Thoroughly clean the walls using a pressure washer or scrub brush to remove dirt, debris, loose paint, and mildew. A clean surface ensures proper adhesion of the new siding.
- Repair and Seal Damaged Areas: Address any underlying issues like cracks in the sheathing, damaged flashing, or gaps around windows and doors. Use appropriate sealant or caulk to ensure a watertight barrier.
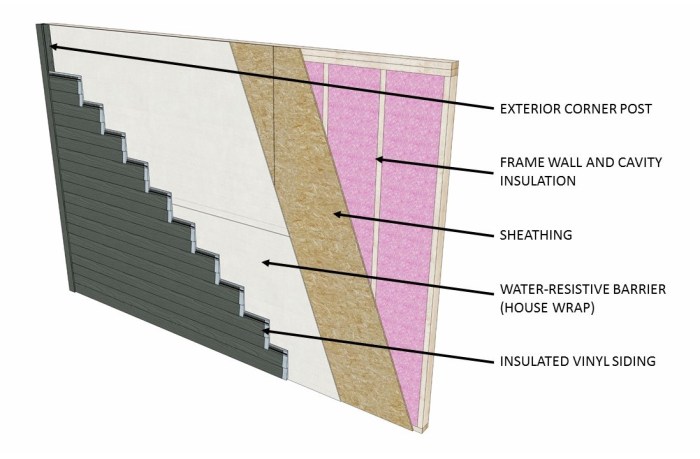
- Install Housewrap (if necessary): Housewrap acts as a moisture barrier, protecting the structure from water damage. Install it according to the manufacturer’s instructions, ensuring proper overlap and sealing.
- Install Flashing: Install flashing around windows, doors, and other areas where the siding meets other building components. This prevents water from penetrating the wall system.
- Inspect and Repair Sheathing: Check the condition of the underlying sheathing. Replace any damaged or rotten sections. This ensures a solid base for the new siding.
Sample Siding Installation Project Timeline
A realistic timeline ensures the project stays on track. This sample timeline assumes a standard-sized single-family home and may vary depending on the complexity of the project and weather conditions.
- Week 1: Planning and material ordering, permits (if required).
- Week 2: Exterior wall preparation – cleaning, repairs, and housewrap installation.
- Week 3-4: Siding installation – including corners, starter strips, and main siding panels.
- Week 5: Trim installation, caulking, and final cleanup.
Necessary Tools and Equipment
Having the right tools ensures efficiency and safety. This table lists essential tools and their safety precautions. Alternatives are suggested where applicable, but using the recommended tools often proves most efficient.
| Tool | Purpose | Safety Precautions | Alternatives |
|---|---|---|---|
| Measuring Tape | Accurate measurements for cutting siding | Ensure the tape measure is in good condition and not stretched | Folding rule |
| Circular Saw | Cutting siding panels to size | Wear safety glasses and hearing protection. Use a sharp blade. Secure the material firmly. | Hand saw (slower) |
| Hammer | Driving nails or staples | Use a claw hammer to remove misplaced nails. Avoid striking your hand. | Nail gun (faster, requires training) |
| Level | Ensuring straight and level installation | Regularly check for accuracy | Laser level (more precise) |
| Caulk Gun | Applying sealant around windows and trim | Use appropriate sealant for the application. | Manual caulking tool (slower) |
| Safety Glasses | Protecting eyes from debris | Always wear when using power tools | N/A |
| Work Gloves | Protecting hands from cuts and splinters | Choose gloves appropriate for the task | N/A |
Siding Installation Techniques for Different Materials
Choosing the right siding material is only half the battle; proper installation is crucial for longevity and aesthetics. Different siding materials require unique techniques to ensure a watertight, durable, and visually appealing finish. This section details the installation methods for common siding types, emphasizing best practices for cutting, measuring, fastening, and achieving a professional look.
The installation process for each siding type varies significantly due to material properties, such as weight, flexibility, and susceptibility to moisture. Understanding these differences is key to successful installation.
Vinyl Siding Installation
Vinyl siding is known for its ease of installation and low maintenance. Its lightweight nature makes handling and cutting straightforward.
- Cutting: Use a sharp utility knife or a fine-toothed saw to cut vinyl siding. Avoid excessive force to prevent cracking or chipping. A miter saw can be used for precise cuts at angles, particularly around corners.
- Measuring: Accurate measurements are essential to avoid gaps and ensure a neat fit. Measure each piece carefully, accounting for overlaps and expansion gaps.
- Fastening: Vinyl siding is typically fastened using galvanized nails or staples, driven near the bottom edge of each panel to allow for expansion and contraction. Avoid over-driving nails, as this can cause distortion.
- Finishing: J-channels, starter strips, and other trim pieces are used to create a clean and professional finish at corners, edges, and around windows and doors. Ensure proper alignment and overlapping to prevent water penetration.
Wood Siding Installation
Wood siding offers a classic and aesthetically pleasing look, but requires more maintenance than vinyl. Its weight and susceptibility to moisture necessitate careful handling and installation.
- Cutting: A circular saw or hand saw is typically used for cutting wood siding. Precise cuts are important for a clean fit. Pre-drilling pilot holes is recommended to prevent splitting, especially with harder wood species.
- Measuring: Similar to vinyl, accurate measurement is critical. Account for overlaps, expansion gaps, and any necessary adjustments for irregular wall surfaces.
- Fastening: Galvanized nails or screws are used to fasten wood siding. The type and size of fastener will depend on the wood species and siding thickness. Pre-drilling pilot holes is crucial to prevent splitting.
- Finishing: Caulk is essential to seal gaps and prevent water penetration. Proper flashing around windows and doors is crucial to protect against moisture damage. A final coat of paint or sealant will protect the wood from the elements.
Fiber Cement Siding Installation
Fiber cement siding offers durability and fire resistance, but it’s heavier and more challenging to cut than vinyl or wood.
- Cutting: A circular saw with a carbide-tipped blade specifically designed for fiber cement is recommended. Wear appropriate safety gear, including a dust mask, as fiber cement dust can be irritating. Scoring the material before cutting helps prevent chipping.
- Measuring: Precise measurements are essential due to the material’s weight and rigidity. Consider using a laser level for accurate alignment.
- Fastening: Corrosion-resistant fasteners are crucial. Pre-drilling pilot holes is recommended to prevent cracking. Fasteners should be driven straight to avoid distortion.
- Finishing: Caulk is used to seal gaps and joints. Proper flashing and trim pieces create a watertight and professional finish. A primer and paint are typically applied for protection and aesthetics.
Metal Siding Installation
Metal siding offers exceptional durability and longevity, but requires specialized tools and techniques due to its rigidity.
- Cutting: Metal siding is typically cut using tin snips or a metal-cutting saw. Precise cuts are essential for a clean fit. Sharp tools are crucial to prevent bending or tearing.
- Measuring: Accurate measurements are crucial due to the material’s inflexibility. A laser level can aid in ensuring straight lines and proper alignment.
- Fastening: Self-tapping screws or rivets are typically used to fasten metal siding. Pre-drilling pilot holes is often necessary to prevent tearing. Consistent spacing and proper depth are vital for a secure installation.
- Finishing: Seams and overlaps should be carefully sealed to prevent water penetration. Proper flashing and trim pieces create a watertight and professional finish.
Addressing Common Challenges During Installation: Residential Siding Installation A Comprehensive Guide
Source: pnnl.gov
Residential siding installation, while seemingly straightforward, often presents unexpected challenges. Understanding these potential problems and having solutions ready is crucial for a successful and aesthetically pleasing outcome. Careful planning and attention to detail throughout the process will minimize these issues and lead to a superior final product.Uneven Walls and Difficult CornersUneven walls and sharp corners are common problems encountered during siding installation.
These irregularities can make it difficult to achieve a clean, consistent look and may compromise the structural integrity of the siding if not properly addressed.
Dealing with Uneven Walls
Uneven walls require careful measurement and cutting of siding panels to ensure a proper fit. One solution involves using shims—thin pieces of wood—to create a level surface for the siding panels to rest on. These shims are strategically placed between the wall and the siding to compensate for irregularities. For larger discrepancies, furring strips—narrow strips of wood attached to the wall—can create a more uniform surface for the siding.
Imagine a wall with a noticeable bulge: furring strips would be nailed to the wall, creating a straighter plane for the siding to attach to. The image would show a cross-section of a wall with a bulge, the furring strips attached to create a flat surface, and then the siding installed over the strips.
Managing Difficult Corners
Corners, especially those that are not perfectly square, require specialized techniques. Pre-fabricated corner pieces are often used to simplify the installation process. These pieces are designed to fit snugly into the corner, providing a clean, finished look. However, for complex angles or curves, custom-cutting of siding panels may be necessary. This involves carefully measuring the angle and cutting the siding panels to fit precisely.
Visualize an image depicting a corner with an inward angle. The image would show a correctly cut and fitted corner piece, seamlessly integrated with the surrounding siding panels. The smooth transition would demonstrate proper corner installation.
Troubleshooting Gaps and Misalignment
Gaps between siding panels can compromise the building’s weather resistance and overall aesthetic appeal. Misaligned panels create an uneven and unprofessional look. Gaps are often caused by improper measurement, cutting, or installation. Careful measurement and precision cutting are essential to prevent this issue. If gaps occur, they can sometimes be filled with appropriately colored caulk, ensuring a watertight seal.
Misaligned panels may need to be removed and reinstalled, paying close attention to the alignment of the panels with neighboring ones. An illustration would show a close-up of two siding panels with a gap between them, followed by an image of the gap filled with caulk. A second illustration would depict a series of misaligned panels, followed by a corrected section showing properly aligned panels.
Mitigating Water Damage
Water damage is a significant concern in siding installation. Improper flashing (a thin piece of metal used to divert water away from joints and seams) around windows and doors can lead to water intrusion. Ensuring proper flashing installation is crucial to prevent water damage. Additionally, adequate sealing of seams and joints is necessary to prevent water leakage.
An image would show the proper installation of flashing around a window, illustrating how it redirects water away from the wall. Another image would show the application of sealant to seams, highlighting the creation of a watertight barrier.
Finishing Touches and Maintenance
The final stages of siding installation involve adding the finishing touches that not only enhance the aesthetic appeal but also protect your home from the elements. Proper installation of trim, flashing, and caulking is crucial for longevity and preventing water damage. Maintaining your siding after installation is equally important to ensure its lifespan and continued beauty.
Installing Trim, Flashing, and Other Finishing Elements
Installing trim pieces, such as corner boards, J-channel, and window and door casings, provides a clean, finished look and protects the edges of the siding. Flashing, typically made of metal or rubber, is essential around windows, doors, and other areas where the siding meets other building components. It prevents water from penetrating behind the siding. Caulking fills gaps and cracks, creating a watertight seal.
Accurate measurements and careful cutting are vital to ensure a neat and professional finish. Different materials require specific installation techniques; for instance, wood trim often requires painting or staining before installation to prevent future rot, while vinyl trim can be easily cut and installed using appropriate fasteners. Correctly applied flashing should overlap slightly to prevent water intrusion.
Caulk should be applied smoothly and evenly to create a continuous seal.
Siding Maintenance and Cleaning
Regular cleaning and maintenance are key to extending the life of your siding. The frequency and method of cleaning will depend on the type of siding. Vinyl siding is relatively low-maintenance, typically requiring only occasional washing with a garden hose and mild detergent. Avoid harsh chemicals or abrasive cleaners, which can damage the surface. Wood siding, however, requires more attention.
Regular cleaning with a soft brush and mild detergent can remove dirt and debris. Wood siding may also benefit from periodic staining or painting to protect it from the elements and prevent rot. Metal siding is durable and relatively easy to clean; however, regular inspections for rust or damage are necessary. For all siding types, it’s crucial to address any damaged or loose pieces promptly to prevent further damage.
Consider professional cleaning for larger homes or heavily soiled siding.
Potential Post-Installation Problems and Preventative Measures
Addressing potential problems after siding installation is crucial for maintaining your home’s exterior. Proactive measures can prevent many issues.
- Water Leaks: Caused by improper flashing or caulking. Preventative Measure: Ensure proper flashing and caulking during installation. Solution: Repair or replace damaged flashing and recaulk as needed.
- Siding Damage: Caused by impact, extreme weather, or improper installation. Preventative Measure: Choose durable siding materials and install them correctly. Solution: Repair or replace damaged siding panels.
- Mold and Mildew: Caused by moisture accumulation. Preventative Measure: Ensure proper ventilation and regular cleaning. Solution: Clean affected areas with a mildew remover and improve ventilation.
- Insect Infestation: Caused by gaps or cracks in siding. Preventative Measure: Seal gaps and cracks during installation. Solution: Contact a pest control professional.
- Sagging or Warping: Caused by improper installation or material defects. Preventative Measure: Use high-quality materials and install according to manufacturer’s instructions. Solution: Repair or replace affected sections.
Safety Precautions and Regulations
Source: wellscustomframers.com
Siding installation, while seemingly straightforward, involves significant safety risks, particularly working at heights and using power tools. Adherence to building codes and regulations is crucial not only for project legality but also for the safety of workers and occupants. This section Artikels essential safety guidelines and legal requirements for residential siding projects.
Working at Heights Safety
Working at heights presents significant fall hazards. Appropriate fall protection is non-negotiable. This includes the use of safety harnesses, anchored securely to a stable structure, and the use of guardrails or scaffolding where feasible. Before beginning any work at height, a thorough risk assessment should be conducted, identifying potential hazards and implementing control measures. For example, if working on a two-story building, a properly erected scaffold with toe boards and guardrails is essential.
Regular inspections of the scaffolding and harnesses are vital to ensure their continued functionality and safety. Furthermore, employees should receive appropriate training on the proper use of fall protection equipment.
Power Tool Safety
Power tools are essential for siding installation, but they pose significant risks if not handled correctly. Always use tools in accordance with the manufacturer’s instructions. This includes wearing appropriate personal protective equipment (PPE), such as safety glasses, hearing protection, and work gloves. Before using any power tool, inspect it for damage and ensure it is properly maintained.
Regular maintenance, including lubrication and blade sharpening, reduces the risk of accidents. Never operate power tools while fatigued or under the influence of drugs or alcohol. For example, when using a circular saw, always use a blade guard and ensure the workpiece is securely clamped to prevent kickback.
Building Codes and Regulations, Residential Siding Installation A Comprehensive Guide
Building codes and regulations vary by location but generally address aspects such as wind resistance, fire safety, and the use of approved materials. These regulations are designed to ensure the structural integrity and safety of the building. Before starting any siding installation, it’s crucial to consult local building codes and obtain any necessary permits. For instance, many jurisdictions require specific types of fasteners for siding based on wind load calculations.
Ignoring these regulations can lead to project delays, fines, and potential safety issues.
Permitting Requirements
Obtaining the necessary permits is a legal requirement and a critical step in ensuring the project’s compliance with local building codes. The specific permits required vary depending on the scope of the project and the local jurisdiction. It’s essential to contact the local building department to determine the exact requirements and submit the necessary paperwork well in advance of starting the work.
Failure to obtain permits can result in stop-work orders, fines, and legal repercussions. The application process typically involves submitting plans and specifications for review and approval by the building inspector.
Cost Considerations and Budgeting
Planning a siding project requires careful consideration of the associated costs. Understanding the various expenses involved will help you create a realistic budget and avoid unexpected financial burdens. This section breaks down typical costs and provides strategies for effective budgeting.
Typical Costs Associated with Residential Siding Installation
The total cost of residential siding installation is influenced by several factors, including the size of your house, the type of siding chosen, the complexity of the job, and your location. It’s crucial to obtain multiple quotes to compare pricing. Below is a sample cost breakdown; actual costs may vary significantly.
| Material | Labor | Permits |
|---|---|---|
| $5,000 – $15,000 (depending on siding type and house size) | $4,000 – $10,000 (depending on house size and complexity) | $100 – $500 (varies by location and project scope) |
Note: This table provides a broad range. Vinyl siding is generally less expensive than fiber cement or wood. Labor costs can increase significantly for houses with complex architectural details or difficult-to-access areas. Permit costs are location-specific and depend on local regulations.
Creating a Realistic Budget for a Siding Project
Developing a comprehensive budget involves several steps. First, accurately measure your home’s exterior to determine the siding area. Next, research siding materials and obtain price quotes from suppliers. Factor in labor costs based on contractor estimates. Remember to include costs for permits, waste removal, and potential unforeseen expenses (a contingency of 10-15% is recommended).
Finally, compare total costs against your available funds to ensure financial feasibility. For example, a 2,000 square foot home might need a budget of $15,000 – $30,000, but this is a rough estimate and can vary wildly.
Finding and Comparing Quotes from Different Contractors
Obtaining multiple quotes from reputable contractors is essential for securing a fair price and choosing a qualified installer. Start by getting at least three quotes, ensuring all contractors are bidding on the same scope of work (same materials, labor, etc.). Compare not only the price but also the contractors’ experience, licensing, insurance, and warranty offerings. Read online reviews and check references before making a final decision.
Remember that the lowest bid isn’t always the best option; consider the overall value and reputation of the contractor. A detailed contract outlining all aspects of the project should be signed before work begins.
Last Point
Successfully installing new siding can dramatically improve your home’s appearance and value. This guide has walked you through the entire process, from initial planning and material selection to the final finishing touches and ongoing maintenance. Remember, careful preparation, attention to detail, and adherence to safety guidelines are crucial for a successful outcome. With the right approach, you can enjoy a beautifully finished exterior that protects your home for years to come, adding both curb appeal and peace of mind.
Question Bank
What is the average lifespan of different siding materials?
Lifespans vary greatly. Vinyl siding can last 20-40 years, wood siding 20-50 years (depending on the type and maintenance), fiber cement 50+ years, and metal siding 40+ years.
Can I install siding myself, or should I hire a contractor?
While DIY is possible for some, particularly with vinyl siding, hiring a professional is often recommended, especially for complex installations or if working at heights. Professionals have experience, the right tools, and insurance.
How much should I budget for permits and inspections?
Permit costs vary widely by location. It’s best to contact your local building department for an estimate. Factor in potential inspection fees as well.
What are some common signs that my siding needs replacing?
Look for signs of damage like cracks, rot, warping, loose panels, significant discoloration, or excessive water damage. If you notice significant problems in multiple areas, replacement might be necessary.
What type of warranty should I expect from a siding contractor?
Reputable contractors offer warranties covering both materials and labor. Make sure to carefully review the terms and conditions before signing any contract.

