
Solar Panel Installation A Comprehensive Guide: Going solar is a big decision, but it doesn’t have to be daunting. This guide walks you through everything you need to know, from understanding the different panel types and system components to navigating the financial aspects and maximizing your environmental impact. We’ll demystify the process, empowering you to make informed choices and harness the power of the sun.
Whether you’re a homeowner looking to reduce your carbon footprint, lower your energy bills, or simply invest in a sustainable future, understanding solar panel installation is key. This guide covers planning, preparation, system design, installation, maintenance, and the financial incentives available, providing a complete picture of what’s involved.
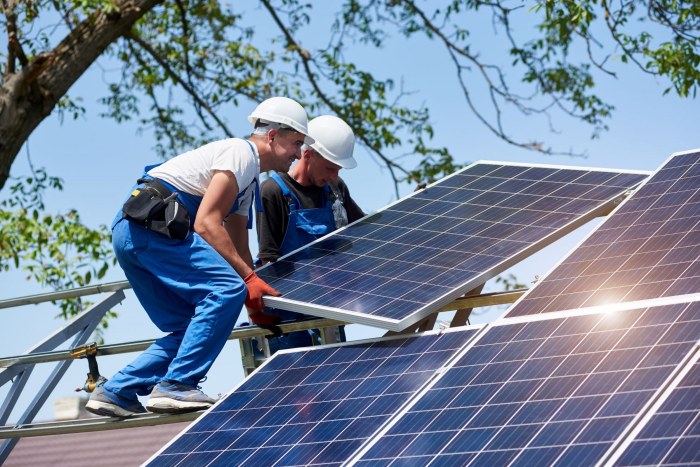
Introduction to Solar Panel Installation
Source: thearchitectsdiary.com
Going solar is a big decision, but for many homeowners, it’s a decision that pays off handsomely in the long run. Installing solar panels offers significant environmental and financial benefits, reducing your carbon footprint while potentially lowering your electricity bills substantially. This guide will walk you through the process, from understanding the different types of panels to the installation itself.Solar panel installation offers numerous advantages.
Firstly, it significantly reduces your reliance on the power grid, lessening your monthly electricity expenses. This translates to substantial long-term savings, potentially recouping the initial investment over time. Secondly, it contributes to a cleaner environment by reducing your carbon emissions. Homeowners often cite this as a key motivating factor, aligning their energy consumption with their environmental values.
Finally, solar panels can increase the value of your home, making it a worthwhile investment even if you eventually move.
Types of Solar Panels
Several types of solar panels are available, each with its own strengths and weaknesses. The most common types are monocrystalline, polycrystalline, and thin-film solar panels. Monocrystalline panels are made from a single silicon crystal, resulting in higher efficiency and a sleek black appearance. Polycrystalline panels, made from multiple silicon crystals, are less efficient but generally more affordable. Thin-film panels are lighter and more flexible, but typically have the lowest efficiency.
The best choice depends on your budget, energy needs, and aesthetic preferences. For example, a homeowner with limited roof space might prioritize the higher efficiency of monocrystalline panels, while someone on a tighter budget might opt for the cost-effectiveness of polycrystalline panels.
Solar Panel Installation Process
The installation process generally involves several key steps. First, a professional assessment of your home’s energy needs and roof suitability is conducted. This assessment determines the optimal size and placement of the solar panel system. Next, the necessary permits and approvals are obtained from local authorities. This process can vary depending on your location and the specific requirements of your local government.
Following this, the panels themselves are installed on your roof, securely mounted using specialized racking systems. Careful consideration is given to ensure optimal sun exposure and structural integrity. The wiring and electrical components are then connected, and the system is integrated with your home’s electrical panel. Finally, a thorough inspection and testing are performed to ensure the system is functioning correctly and safely.
This typically includes checking for voltage, current, and power output. A final inspection by a qualified electrician often concludes the process, ensuring compliance with safety regulations.
Planning and Preparation
Successfully installing solar panels requires meticulous planning and preparation. Overlooking even small details can lead to delays, increased costs, or even system malfunctions. This section Artikels crucial steps to ensure a smooth and efficient installation process.Before you even contact an installer, a thorough preparation phase is essential. This involves understanding your energy needs, assessing your property’s suitability, and navigating the permitting process.
Proper planning minimizes surprises and maximizes the return on your investment.
Homeowner’s Solar Panel Installation Checklist
A comprehensive checklist helps homeowners stay organized and on track throughout the solar panel installation process. This ensures all necessary steps are completed before the installation crew arrives.
- Assess your energy consumption: Review your past 12 months of electricity bills to determine your average energy usage.
- Determine your budget: Solar panel systems vary in cost; establish a realistic budget to guide your choices.
- Research installers: Obtain multiple quotes from reputable solar installers in your area, comparing their experience, warranties, and customer reviews.
- Check for HOA restrictions: If you live in a homeowner’s association (HOA), confirm that solar panel installation is permitted and review any aesthetic guidelines.
- Obtain necessary permits: Apply for all required building permits and approvals from your local authorities well in advance.
- Prepare your roof: Ensure your roof is in good condition and can support the weight of the solar panels.
- Schedule installation: Coordinate with your chosen installer to schedule the installation date and time.
Site Assessment and Solar Panel Placement
Careful site assessment is crucial for optimizing solar panel performance and ensuring a safe and efficient installation. This involves analyzing factors such as sunlight exposure, roof orientation, shading, and potential obstructions.Factors to consider include the roof’s orientation (south-facing is generally ideal in the Northern Hemisphere), the angle of the roof, and the presence of any shading from trees, buildings, or other structures.
A professional installer will use specialized software to model the sun’s path throughout the year and determine the optimal placement for maximum energy production. They’ll also consider factors like the structural integrity of your roof to ensure a safe and secure installation. For example, an installer might need to reinforce a section of the roof if it’s deemed structurally unsound to handle the weight of the solar panels.
Obtaining Necessary Permits and Approvals
Securing the necessary permits and approvals is a non-negotiable step. Failing to do so can result in significant delays, fines, and even the need to remove the installed system. The specific permits required vary depending on your location and the size of the system. These often include building permits, electrical permits, and potentially others depending on local regulations.
It’s advisable to start the permitting process well in advance of the planned installation date, as the review and approval process can take several weeks or even months. Consulting your local building department early in the planning stages is recommended to understand the specific requirements in your area.
Comparison of Solar Panel Manufacturers and Warranties
Choosing a reputable manufacturer is critical for ensuring the long-term performance and reliability of your solar panel system. Warranties provide crucial protection against defects and malfunctions.
| Manufacturer | Panel Type | Power Output (Watts) | Warranty |
|---|---|---|---|
| SunPower | Monocrystalline | 350-400+ | 25 years |
| LG | Monocrystalline | 360-400+ | 25 years |
| Panasonic | HIT (Heterojunction with Intrinsic Thin-layer) | 300-360+ | 25 years |
| REC | Monocrystalline | 300-400+ | 25 years |
System Design and Components
Designing a solar panel system involves carefully selecting and integrating various components to achieve optimal energy production and efficiency. A well-designed system ensures reliable performance and maximizes return on investment. This section details the key components and their functions.
A typical solar panel system comprises several interconnected parts working together to convert sunlight into usable electricity. Understanding each component’s role is crucial for successful installation and operation.
Solar Panels
Solar panels, also known as photovoltaic (PV) panels, are the heart of the system. They are composed of numerous photovoltaic cells, typically made of silicon, which convert sunlight directly into direct current (DC) electricity. The efficiency of a solar panel depends on factors such as cell technology, material quality, and manufacturing processes. Higher efficiency panels produce more electricity from the same surface area, leading to potential cost savings on installation.
Panel selection should consider factors like available roof space, sunlight exposure, and desired energy output. For example, a homeowner with limited roof space might opt for higher-efficiency panels to maximize energy generation within the available area.
Inverters
Inverters convert the DC electricity generated by the solar panels into alternating current (AC) electricity, which is the type of electricity used in homes and businesses. Different inverter types exist, each with its advantages and disadvantages:
- String Inverters: These are the most common type, connecting multiple solar panels in series to form a string. A single string inverter converts the DC electricity from the entire string into AC electricity. String inverters are generally less expensive than other types but have the drawback that a single faulty panel can affect the entire string’s output.
- Microinverters: Each solar panel has its own microinverter, converting DC to AC individually. This allows for optimized performance of each panel, even if others are shaded or damaged. While more expensive upfront, microinverters offer higher efficiency and improved energy production, especially in partially shaded conditions.
- Power Optimizers: These devices sit between the solar panels and the inverter, maximizing the energy output of each panel by adjusting the voltage and current. They offer a balance between the cost-effectiveness of string inverters and the performance benefits of microinverters.
Racking and Mounting Systems
Racking systems provide a secure and stable structure to mount the solar panels on the roof or ground. The choice of racking depends on the roof type, panel orientation, and local building codes. Proper racking ensures optimal sunlight exposure and protects the panels from environmental factors. Different materials, such as aluminum and steel, are used in racking systems, each with its own strengths and weaknesses concerning durability, weight, and cost.
Wiring and Connectors
Proper wiring is crucial for safe and efficient energy transfer. Specialized solar cables and connectors are used to connect the panels to the inverter and the inverter to the electrical grid. These components must be correctly sized and installed to prevent energy loss and ensure system safety. Appropriate wire gauge selection is vital to minimize voltage drop over long distances and maintain optimal system performance.
Other Components
Beyond the core components, other essential elements include:
- Disconnects: These switches allow for safe isolation of the solar panel system from the grid during maintenance or emergencies.
- Monitoring Systems: These systems track the performance of the solar panel system, providing data on energy production, system efficiency, and potential issues.
- Grounding and Surge Protection: These safety features protect the system from lightning strikes and other electrical surges.
System Diagram
Imagine a diagram showing the following: Several solar panels (represented by rectangular boxes with “+” and “-” symbols indicating DC output) connected in series or parallel, depending on the inverter type. These panels are then connected to either a string inverter (a single box representing the inverter) or multiple microinverters (small boxes attached to each panel). The inverter(s) then connect to the main electrical panel of the house via appropriate wiring and a disconnect switch.
The entire system is mounted securely on a roof using a racking system. A monitoring system is connected to display real-time data. Each component is clearly labeled.
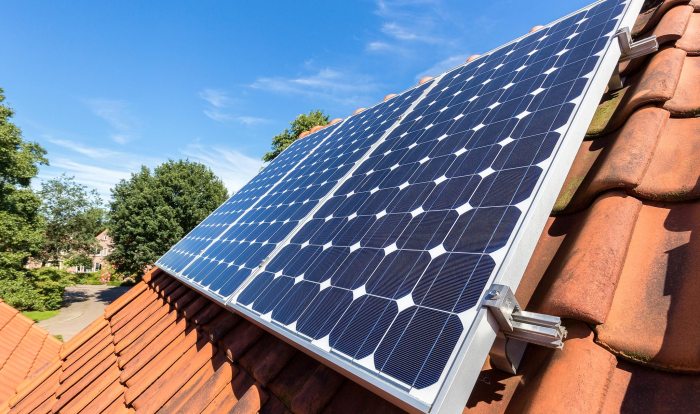
Installation Process
Source: gov.lk
The physical installation of a solar panel system is a complex process requiring specialized knowledge and adherence to safety regulations. Proper installation ensures optimal system performance and longevity, while neglecting safety protocols can lead to serious injury or damage. This section details the step-by-step process, emphasizing safety and best practices.
The installation process typically begins with the preparation of the mounting system, followed by the secure attachment of the solar panels, wiring connections, and finally, system testing and commissioning. Each step demands precision and attention to detail.
Mounting System Preparation
Before installing the panels themselves, the mounting system must be carefully prepared and secured. This involves accurately determining the location of each panel based on the system design and ensuring the structural integrity of the mounting hardware. The chosen mounting method—roof-mounted, ground-mounted, or other—will dictate the specific procedures. For example, roof-mounted systems require careful consideration of roof type, structural capacity, and potential for water damage.
A typical process might involve pre-drilling holes (carefully avoiding electrical wiring or plumbing), securing mounting rails to the roof or ground using appropriate fasteners, and ensuring a level and stable platform for the panels. Proper grounding of the mounting system is crucial for safety. Thorough inspection of the mounting system before proceeding to panel installation is essential.
Solar Panel Installation
Once the mounting system is prepared, the solar panels are carefully attached. This requires precision to ensure optimal panel alignment and secure fastening. Each panel should be firmly fixed to prevent movement or damage, while allowing for minimal shading. Improper panel alignment can significantly reduce energy production.
- Carefully lift and position each solar panel onto the prepared mounting system.
- Securely fasten each panel using the appropriate hardware provided by the manufacturer. Over-tightening can damage the panel frame, while under-tightening can lead to instability.
- Inspect each panel’s connection to the mounting system, ensuring it is stable and secure.
- Repeat this process for all panels in the array.
Wiring and Connections
Connecting the panels to the inverter and the electrical grid is a critical step that demands expertise and adherence to electrical codes. Incorrect wiring can lead to system malfunctions, fire hazards, or even electrocution. The process involves carefully connecting the positive and negative wires from each panel to the combiner box, then running the main wiring from the combiner box to the inverter.
Proper grounding and use of appropriate wire sizes are crucial. All connections must be made securely and protected from the elements. Professional installers use specialized tools and techniques to ensure safe and efficient wiring.
Inverter Connection and Grid Tie
The inverter converts the direct current (DC) electricity generated by the solar panels into alternating current (AC) electricity compatible with the home’s electrical system and the grid. Connecting the inverter involves carefully attaching the DC wires from the combiner box to the inverter’s input terminals and the AC output wires to the main electrical panel.
This process necessitates precise adherence to electrical codes and safety regulations. The inverter should be properly grounded, and all connections must be made securely. A qualified electrician is typically required for this stage of the installation.
System Testing and Commissioning
Once the installation is complete, the system must be thoroughly tested and commissioned to ensure proper functionality and safety. This involves checking the voltage and current output of the panels, verifying the inverter’s operation, and confirming that the system is properly connected to the grid.
Testing procedures may include using a multimeter to measure voltage and current at various points in the system, monitoring the inverter’s performance data, and checking for any signs of malfunction. After successful testing and verification of all safety protocols, the system can be commissioned and connected to the grid, usually requiring inspection and approval by the local utility company.
Safety Precautions and Best Practices
Safety should be the paramount concern throughout the entire installation process. Installers should always follow established safety protocols, including using appropriate personal protective equipment (PPE), such as safety glasses, gloves, and insulated tools. Working at heights requires additional safety measures, such as fall protection equipment.
Before beginning any work, always disconnect the power supply to the relevant circuits. Never work on live electrical circuits. Regularly inspect the system for any signs of damage or malfunction, and promptly address any issues identified. Regular maintenance and cleaning of the solar panels can ensure optimal performance and extend the lifespan of the system.
Maintenance and Troubleshooting: Solar Panel Installation A Comprehensive Guide
Keeping your solar panel system running smoothly requires regular maintenance and the ability to troubleshoot common problems. Neglecting maintenance can lead to reduced efficiency and costly repairs down the line, while knowing how to address common issues can save you time and money. This section details routine maintenance tasks and provides a troubleshooting guide for common problems.Regular maintenance and prompt troubleshooting are crucial for maximizing the lifespan and efficiency of your solar panel system.
Proactive care ensures optimal energy production and minimizes the risk of unexpected breakdowns.
Routine Maintenance Tasks
Routine maintenance is straightforward and can often be handled by the homeowner. Regular checks and cleaning will significantly extend the life of your system and ensure optimal performance.
- Panel Cleaning: Clean your solar panels at least twice a year, or more frequently if you live in a dusty or high-pollution area. Use a soft brush, sponge, or a soft cloth and plain water. Avoid harsh chemicals or abrasive cleaners. A garden hose with a nozzle is usually sufficient. Always ensure the panels are dry before leaving them.
- Inverter Inspection: Inspect your inverter regularly for any signs of damage, overheating, or unusual noises. Check the connections to ensure they are secure. Many inverters have visual indicators that will signal potential problems.
- Wiring and Connections: Periodically check all wiring and connections for any signs of damage or loose connections. Ensure that all connections are secure and properly insulated. Loose connections can lead to reduced efficiency or even safety hazards.
- System Monitoring: Monitor your system’s performance regularly using your monitoring system (if equipped). This will allow you to identify any anomalies or drops in energy production early on. Most modern systems provide online dashboards to track energy generation and system health.
Common Problems and Solutions
Several issues can affect the performance of your solar panel system. Understanding these common problems and their solutions can help you address them promptly and effectively.
- Reduced Energy Production: This can be due to several factors, including shading, soiling, faulty panels, or inverter issues. Check for shading from trees or buildings, clean the panels, and inspect the inverter and wiring for problems. A qualified technician may be needed to diagnose more complex issues.
- Inverter Malfunction: Inverters can fail due to overheating, age, or electrical surges. Look for error codes on the inverter display and consult the manufacturer’s manual. If the problem persists, contact a qualified technician for repair or replacement.
- Faulty Panels: Individual panels can develop cracks, hotspots, or other damage. Visual inspection can identify these issues. A damaged panel will likely need to be replaced by a qualified technician.
- Wiring Problems: Loose or damaged wiring can cause reduced energy production or even safety hazards. Regularly inspect wiring and connections, ensuring they are secure and properly insulated. If you find damaged wiring, contact a qualified technician for repairs.
Troubleshooting Guide
This guide provides a systematic approach to troubleshooting common solar panel system issues. Remember to always prioritize safety and disconnect the system from the grid if necessary before performing any repairs.
| Problem | Possible Cause | Solution |
|---|---|---|
| No Power | Tripped breaker or blown fuse | Reset the breaker or replace the fuse. |
| Low Power Output | Shading of panels | Trim overhanging branches or relocate obstructions. |
| Inverter Error Codes | Inverter malfunction | Consult the inverter manual and contact a technician if needed. |
| Hotspot on Panel | Faulty panel cell | Contact a technician for panel replacement. |
| Intermittent Power | Loose wiring | Check and tighten all wiring connections. |
Financial Aspects and Incentives

Source: unboundsolar.com
Going solar is a significant investment, but the long-term benefits—both environmental and financial—can be substantial. Understanding the financial landscape, including available financing options and government incentives, is crucial for making an informed decision and maximizing your return on investment. This section will explore these key aspects to help you navigate the financial side of solar panel installation.
Financing Options for Solar Panel Installations, Solar Panel Installation A Comprehensive Guide
Several financing options exist to make solar panel installations more accessible. These options cater to different budgets and financial situations. Choosing the right option depends on factors like your credit score, available cash, and long-term financial goals.
- Cash Purchase: This is the most straightforward method, offering complete ownership from the outset. It’s ideal for those with sufficient savings and a preference for avoiding debt.
- Loans: Several lenders offer specialized loans for solar panel installations, often with competitive interest rates and extended repayment periods. These loans can be secured or unsecured, depending on the lender’s requirements and the borrower’s financial profile. For example, some banks offer green loans specifically designed for renewable energy projects.
- Leasing: With a solar lease, you don’t own the panels, but you pay a monthly fee to the company that owns and maintains them. This option requires no upfront investment but limits your potential financial gains.
- Power Purchase Agreements (PPAs): Similar to leasing, a PPA allows you to purchase the electricity generated by the solar panels without owning them. The solar company handles installation, maintenance, and insurance, and you pay a fixed monthly rate for the electricity produced.
Government Incentives and Rebates for Solar Energy
Many governments offer financial incentives to encourage the adoption of solar energy. These incentives can significantly reduce the overall cost of a solar panel installation. The availability and amount of these incentives vary by location and may change over time, so it’s crucial to research your local and national programs.
- Federal Tax Credits: In many countries, including the United States, a federal tax credit is available for a percentage of the cost of a solar energy system. This credit reduces your taxable income, effectively lowering the overall cost of the installation. The specific percentage and eligibility requirements vary by country and year. For instance, the US Investment Tax Credit (ITC) has been a significant driver of solar adoption.
- State and Local Incentives: Many states and local governments offer additional incentives, such as rebates, tax exemptions, or performance-based incentives. These programs often supplement federal incentives and can further reduce the cost of your solar installation. Examples include state-level renewable portfolio standards (RPS) that mandate a certain percentage of electricity generation from renewable sources, indirectly incentivizing solar adoption.
- Net Metering: Net metering programs allow homeowners with solar panels to sell excess electricity generated back to the grid, earning credits on their electricity bill. This can significantly offset the cost of your electricity consumption and increase your return on investment.
Maximizing Returns on Investment
Maximizing your return on investment requires careful planning and consideration of various factors. This includes selecting the right system size, optimizing your energy consumption, and taking advantage of all available incentives.
- System Sizing: A properly sized system should meet your energy needs without overspending. Oversizing can lead to wasted investment, while undersizing may not fully offset your electricity consumption.
- Energy Efficiency Measures: Implementing energy-efficient practices, such as upgrading to LED lighting and improving insulation, can further reduce your electricity consumption and maximize the benefits of your solar panel system.
- Professional Installation: Choosing a reputable installer is critical to ensuring the optimal performance and longevity of your solar panel system. A poorly installed system can lead to reduced efficiency and higher maintenance costs.
- Monitoring and Maintenance: Regular monitoring and maintenance can help identify and address any potential issues early on, ensuring the long-term performance of your solar panel system.
Sample Cost Breakdown for a Typical Solar Panel Installation
The cost of a solar panel installation varies significantly based on several factors, including system size, location, and chosen financing options. This sample cost breakdown provides a general estimate, and actual costs may differ.
| Item | Cost |
|---|---|
| Solar Panels (5kW system) | $15,000 |
| Inverter | $2,000 |
| Installation Labor | $5,000 |
| Permitting and Inspections | $1,000 |
| Mounting Hardware | $1,000 |
| Total Before Incentives | $24,000 |
| Federal Tax Credit (26%) | -$6,240 |
| State Rebate ($1,000) | -$1,000 |
| Total After Incentives | $16,760 |
Note: This is a simplified example and actual costs can vary significantly depending on location, system size, and available incentives. It’s crucial to obtain multiple quotes from reputable installers to accurately assess the cost of your project.
Environmental Impact
Solar energy offers a compelling alternative to traditional energy sources, significantly reducing our environmental footprint and mitigating the impacts of climate change. The transition to solar power represents a crucial step towards a more sustainable and environmentally responsible future.The environmental benefits of solar energy are multifaceted and substantial. By harnessing the sun’s energy, we avoid the release of greenhouse gases associated with fossil fuel combustion, a primary driver of global warming.
Furthermore, solar energy production doesn’t involve the extraction, transportation, or processing of finite resources, minimizing environmental damage linked to mining and drilling.
Carbon Footprint Reduction
Solar panel installations directly contribute to a significant reduction in carbon emissions. A typical residential solar panel system can offset several tons of carbon dioxide emissions annually, depending on its size and energy production. For example, a 5kW system in a sunny location might offset approximately 6 tons of CO2 per year. This reduction translates to a smaller carbon footprint for both individual households and the broader energy sector.
Larger-scale solar farms can achieve even more substantial carbon emission reductions, playing a vital role in achieving national and international climate goals. The cumulative effect of widespread solar adoption is a substantial decrease in greenhouse gas emissions, helping to combat climate change.
Comparison with Other Energy Sources
Compared to fossil fuels (coal, oil, and natural gas), solar energy boasts a vastly superior environmental profile. Fossil fuel extraction and combustion release significant quantities of greenhouse gases, pollutants, and particulate matter, contributing to air and water pollution, acid rain, and respiratory illnesses. Nuclear power, while low-carbon during operation, presents challenges related to nuclear waste disposal and the risk of accidents.
Hydropower, although renewable, can disrupt ecosystems and aquatic life. In contrast, solar energy’s environmental impact is minimal, primarily limited to the manufacturing and disposal of solar panels, which are increasingly being addressed through recycling initiatives. Wind energy is another renewable source with a relatively low environmental impact, but solar energy offers advantages in terms of land use and energy output consistency in certain regions.
Visual Representation of Environmental Impact Reduction
Imagine a bar graph. The X-axis represents different energy sources: Coal, Oil, Natural Gas, Nuclear, Hydropower, Wind, and Solar. The Y-axis represents the amount of CO2 emitted per unit of energy produced (in metric tons/MWh). The bars for coal, oil, and natural gas would be significantly taller than the others, reflecting their high carbon emissions. The bars for nuclear and hydropower would be shorter, indicating lower emissions but still higher than solar and wind.
The bars for wind and solar would be the shortest, demonstrating their significantly lower carbon footprint. The difference in height between the fossil fuel bars and the solar bar would visually emphasize the substantial environmental advantage of solar energy. For example, coal might be represented by a bar 10 times taller than the solar bar, clearly illustrating the dramatic difference in CO2 emissions.
Epilogue
From initial planning to long-term maintenance, successfully installing solar panels requires careful consideration and execution. This comprehensive guide has equipped you with the knowledge to make informed decisions at each stage. By understanding the benefits, the process, and the financial implications, you can confidently embark on your journey towards solar energy independence and contribute to a greener future.
Remember to always consult with qualified professionals for installation and to leverage available incentives to maximize your investment. Embrace the sun!
Essential Questionnaire
How long does a solar panel installation typically take?
Installation time varies depending on system size and complexity, but generally ranges from a few days to a couple of weeks.
What is the lifespan of solar panels?
Most solar panels have a lifespan of 25-30 years, with performance gradually declining over time.
Do I need to replace my entire roof before installing solar panels?
Not necessarily. The suitability of your existing roof will be assessed during the site survey. However, significant roof repairs might be necessary in some cases.
What happens during the system inspection and permitting process?
Inspectors verify the system’s compliance with safety codes and regulations. Permits ensure the installation is legal and meets local standards.
Can I sell excess solar energy back to the grid?
In many areas, net metering programs allow you to sell excess energy generated by your solar panels back to the utility company.

