
Stone Veneer Siding Installation A Comprehensive Guide – Stone Veneer Siding Installation: A Comprehensive Guide delves into the art of transforming homes with the enduring beauty and durability of stone veneer. This guide navigates you through every stage, from initial planning and material selection to the intricacies of installation and the long-term maintenance required to preserve its stunning appeal. We’ll explore various installation techniques, offering insights into maximizing both aesthetic impact and structural integrity.
Whether you’re a seasoned DIY enthusiast or a homeowner embarking on your first renovation project, this guide provides the knowledge and confidence to successfully complete your stone veneer siding installation.
We will cover essential topics such as choosing the right stone veneer for your home’s architectural style, preparing the surface for installation, mastering various cutting and shaping techniques, and ensuring proper sealing and caulking to prevent water damage. Understanding the cost considerations, including materials, labor, and permits, is also crucial, and this guide will provide a clear breakdown to help you budget effectively.
Finally, we’ll showcase stunning visual examples of completed projects, inspiring you with the transformative power of stone veneer siding.
Introduction to Stone Veneer Siding
Stone veneer siding is a type of exterior cladding that uses thin slices of natural or manufactured stone to create a stone-like appearance on a building’s exterior. It offers a visually appealing alternative to traditional siding materials while often being lighter and easier to install. Its applications range from residential homes and commercial buildings to accent walls and even interior design features.Stone veneer offers a unique blend of aesthetic appeal and practical benefits.
However, like any building material, it has both advantages and disadvantages that should be carefully considered before installation.
Advantages and Disadvantages of Stone Veneer Siding
Stone veneer provides a durable and long-lasting exterior, enhancing curb appeal and potentially increasing property value. Its natural beauty adds character and sophistication, unlike more uniform materials. It’s relatively low-maintenance, requiring minimal upkeep compared to wood or some other types of siding. Furthermore, it offers excellent insulation properties, contributing to energy efficiency. However, stone veneer can be more expensive than other siding options like vinyl or fiber cement.
Installation requires specialized skills and may be more time-consuming. The weight of the veneer might necessitate additional structural support in some cases, adding to the overall cost. Finally, while durable, it is not impervious to damage and may require occasional repairs.
Types of Stone Veneer and Their Aesthetic Appeal
A wide variety of stone veneer options are available, each offering a unique aesthetic. The choice depends largely on personal preference and the architectural style of the building.
- Natural Stone Veneer: This type uses thin slices of genuine stone, such as granite, slate, limestone, or sandstone. The variations in color, texture, and veining create a truly natural and often rustic look. For example, a home with slate veneer might evoke a rugged, mountainous feel, while limestone could provide a more classic, elegant appearance.
- Manufactured Stone Veneer: This option mimics the look of natural stone but is created from a concrete mix. It offers a more consistent appearance and is often more affordable than natural stone. Manufactured stone can be designed to resemble various natural stone types, providing a wide range of aesthetic possibilities. A house with manufactured stone that imitates granite would give a similar high-end look to actual granite but at a lower cost.
- Cultured Stone Veneer: This is a specific type of manufactured stone, often made to closely replicate the texture and color of natural stone. It is frequently used in residential applications due to its affordability and versatility. For instance, cultured stone that imitates fieldstone might be ideal for a farmhouse or cottage-style home.
Planning and Preparation for Installation
Source: graberpost.com
Proper planning and preparation are crucial for a successful stone veneer siding installation. Failing to adequately prepare the surface can lead to issues such as uneven application, premature deterioration, and ultimately, an unsatisfactory final product. This section Artikels the necessary steps to ensure a smooth and efficient installation process.
Exterior Wall Preparation Checklist
A meticulously prepared wall surface is paramount for achieving a durable and aesthetically pleasing stone veneer installation. Overlooking even minor details can compromise the longevity and appearance of the finished project. The following checklist details the essential steps:
- Surface Cleaning: Thoroughly clean the exterior wall to remove dirt, debris, loose paint, and any other contaminants. Power washing is often recommended for this step.
- Repairing Damaged Areas: Address any cracks, holes, or damaged areas in the wall’s surface. Repair these using appropriate patching materials and ensure a smooth, level surface before proceeding.
- Moisture Barrier Installation: Install a suitable moisture barrier, such as a housewrap, to protect the wall from moisture intrusion. This is especially important in areas prone to high humidity or rainfall.
- Framing and Furring Strips (if necessary): If the wall is uneven or requires additional support for the veneer, install furring strips to create a level surface. This is crucial for achieving a consistent appearance and ensuring proper adhesion of the veneer.
- Inspection: Conduct a final inspection of the prepared wall to ensure it is clean, level, and free of any defects that could compromise the installation.
Tools and Materials
The tools and materials needed for a stone veneer installation vary depending on the project’s scale and complexity. However, the following table lists essential items for a typical installation:
| Tool | Description | Purpose | Quantity Needed |
|---|---|---|---|
| Measuring Tape | A tape measure, preferably one at least 25 feet long | Accurate measurements of the wall and stone veneer | 1 |
| Level | A 4-foot level, or longer depending on wall size | Ensuring level installation of furring strips and veneer | 1 |
| Mason’s Trowel | A trowel specifically designed for masonry work | Applying mortar to the back of the stone veneer | 1 |
| Notch Trowel | A trowel with notched edges | Creating even mortar beds for the stone veneer | 1 |
| Rubber Mallet | A mallet with a rubber head | Tapping stone veneer into place without damaging it | 1 |
| Safety Glasses | Protective eyewear | Protecting eyes from debris | 1 pair |
| Work Gloves | Heavy-duty work gloves | Protecting hands from cuts and abrasions | 1 pair |
| Stone Veneer | Manufactured stone veneer panels or individual stones | The facing material for the exterior wall | As needed, based on wall area |
| Mortar Mix | Pre-mixed or dry-mix mortar specifically designed for stone veneer | Adhesive for the stone veneer | As needed, based on wall area |
| Caulk | Exterior-grade caulk | Sealing gaps and joints | 1 tube |
Accurate Measurements
Accurate measurements are fundamental to a successful stone veneer installation. Inaccurate measurements can lead to material waste, an uneven appearance, and potentially, structural issues. Measurements should be taken multiple times, and cross-checked for accuracy. Using a laser measure can significantly increase accuracy, especially for larger projects. Detailed drawings or plans should be created to visualize the layout of the stone veneer before beginning installation, minimizing errors and ensuring efficient material use.
Remember to account for waste and add extra material to compensate for potential cutting and fitting needs.
Installation Techniques and Methods
Source: ctfassets.net
Installing stone veneer siding involves a careful process, requiring attention to detail to ensure a long-lasting and aesthetically pleasing result. The choice of installation method significantly impacts the project’s cost, complexity, and the final appearance of the finished product. Two primary methods exist: dry-stacking and mortar application. Each presents unique challenges and advantages.
The selection of the appropriate installation method depends on several factors including the type of stone veneer being used, the desired aesthetic, the skill level of the installer, and the budget allocated for the project. Understanding the nuances of each technique is crucial for successful installation.
Dry-Stack Installation
Dry-stacking, as the name suggests, involves installing stone veneer without the use of mortar. This method is often preferred for its simplicity and faster installation time. However, it requires carefully selected, uniformly sized stones to ensure stability and prevent gaps. Proper planning and meticulous placement are essential.
Steps involved in dry-stacking stone veneer siding:
- Prepare the surface: Ensure the wall is clean, level, and free of debris. A properly prepared surface is the foundation for a successful installation, regardless of the chosen method.
- Install a moisture barrier: This prevents water damage and protects the underlying structure. A high-quality, properly installed moisture barrier is essential for longevity.
- Begin installation at a corner or a visually prominent area: This helps establish a consistent pattern and provides a reference point for subsequent installations.
- Place stones without mortar: Carefully select and place each stone, ensuring a tight fit and visually appealing arrangement. Consider varying stone sizes and orientations to create a natural look.
- Use wedges or shims to maintain even spacing: This ensures a uniform appearance and prevents gaps from forming. This is particularly important in dry-stacking to compensate for variations in stone size and shape.
- Secure stones with mechanical fasteners: While dry-stacking avoids mortar, mechanical fasteners are typically used to secure larger or more precarious stones to the wall. This adds structural integrity.
- Fill gaps with grout or caulk: Minor gaps may still occur even with careful placement. These should be filled with a matching grout or caulk to ensure a seamless finish.
Mortar Application Installation
Mortar application provides superior strength and water resistance compared to dry-stacking. It allows for greater flexibility in stone selection and placement, accommodating variations in stone size and shape more easily. However, it’s a more time-consuming and labor-intensive method.
Proper mortar mixing and application are critical to the success of this method. The mortar should be mixed according to the manufacturer’s instructions, achieving the correct consistency for optimal adhesion and workability. Too much water will weaken the mortar, while too little will make it difficult to work with.
Steps involved in mortar application installation:
- Prepare the surface: As with dry-stacking, a clean, level, and debris-free surface is paramount. This step cannot be overemphasized.
- Install a moisture barrier: Protecting the underlying structure from moisture is crucial for preventing long-term damage.
- Apply mortar to the back of the stone: Use a trowel to apply a consistent layer of mortar, ensuring full contact with the backing material.
- Place the stone firmly against the wall: Press the stone firmly into place, ensuring proper alignment and contact with the mortar bed.
- Use spacers to maintain consistent joints: Spacers ensure uniform spacing between stones for a professional and visually appealing finish.
- Tool the mortar joints: Once the mortar has set slightly, tool the joints to create a neat and consistent finish. This enhances the overall aesthetic appeal.
- Allow sufficient curing time: Allow the mortar to cure completely before proceeding with any further work. This ensures the strength and durability of the installation.
Comparison of Installation Methods
| Feature | Dry-Stack | Mortar Application |
|---|---|---|
| Cost | Generally lower | Generally higher |
| Complexity | Lower | Higher |
| Durability | Lower | Higher |
| Water Resistance | Lower | Higher |
| Installation Time | Faster | Slower |
Cutting and Shaping Stone Veneer
Precise cutting and shaping are crucial for a professional-looking stone veneer installation. The ability to accurately cut and shape the veneer allows for a seamless integration with existing structures and the creation of aesthetically pleasing designs. Various methods exist, each suited to different stone types and project needs. Safety is paramount throughout this process.
Several techniques exist for cutting and shaping stone veneer, each with its advantages and disadvantages depending on the stone type and the desired shape. The most common methods involve using masonry saws, angle grinders with diamond blades, and specialized stone-cutting tools. For more intricate shaping, hand tools such as chisels and hammers might be employed, but this requires significant skill and patience.
Remember to always prioritize safety by wearing appropriate personal protective equipment (PPE).
Methods for Cutting and Shaping Stone Veneer
The choice of cutting method depends heavily on the type of stone veneer being used. For example, softer stones might be more easily cut with a masonry saw, while harder stones might require a diamond blade on an angle grinder. Regardless of the method, careful measurement and marking are essential to avoid waste and ensure a precise fit.
Dry-fitting the pieces before cutting is always recommended.
| Cutting Tool | Material Type | Best Practices | Safety Measures |
|---|---|---|---|
| Masonry Saw (wet saw) | Softer stones like limestone or sandstone | Use plenty of water to keep the blade cool and prevent dust. Make multiple passes for cleaner cuts. | Wear eye protection, hearing protection, and a dust mask. Ensure proper ventilation. |
| Angle Grinder with Diamond Blade | Harder stones like granite or slate | Use a blade specifically designed for stone. Work slowly and steadily to avoid chipping or cracking. | Wear eye protection, hearing protection, and gloves. Use a dust mask or respirator to avoid inhaling stone dust. |
| Chisels and Hammers | Softer stones, for shaping and fine adjustments | Use a mallet to strike the chisel, applying even pressure. Work carefully to avoid damaging the stone. | Wear eye protection and gloves. Use a stable work surface. |
| Nibblers (pneumatic or electric) | Thin stone veneers, for intricate cuts | Use appropriate pressure and speed. Multiple passes might be necessary. | Wear eye protection and hearing protection (if pneumatic). |
Safety Precautions for Handling and Cutting Stone Veneer
Stone veneer, while aesthetically pleasing, can present safety hazards if not handled correctly. Sharp edges and the potential for dust inhalation necessitate the use of appropriate safety equipment. Always wear safety glasses or a face shield to protect your eyes from flying debris. A dust mask or respirator is essential to prevent inhaling harmful stone dust, especially when working with harder stones.
Hearing protection is recommended when using power tools like angle grinders. Gloves should be worn to protect your hands from sharp edges and potential cuts. Furthermore, ensure a well-ventilated work area to minimize dust accumulation. Proper handling and disposal of stone dust is also important for environmental reasons.
Stone veneer siding installation can be a rewarding DIY project, but requires careful planning and execution. For those needing a break from the meticulous work, perhaps a reward is in order – checking out the latest gaming laptops available at Laptop gaming terbaru might be a nice diversion. Then, refreshed and ready, you can return to perfecting your stone veneer siding installation, ensuring a beautiful and lasting exterior for your home.
Finishing and Caulking
Proper finishing and caulking are crucial steps in stone veneer installation, ensuring a durable, watertight, and aesthetically pleasing final product. Neglecting these steps can lead to costly repairs down the line, including water damage to the underlying structure and unsightly gaps. This section details the techniques for achieving a professional finish and preventing water intrusion.The primary goal of caulking in stone veneer installation is to seal any gaps or joints between the stones and between the stones and other building materials, preventing water from penetrating the wall system.
Stone veneer siding installation, as detailed in our comprehensive guide, can significantly enhance your home’s curb appeal. For a break from home improvement, perhaps check out the exciting possibilities mentioned in this article about upcoming multiplayer online games: Tren game online multiplayer tahun 2025 yang patut dicoba. Afterward, you can return to the satisfying work of choosing the perfect stone veneer for your project and completing your installation.
Water penetration can lead to mold growth, structural damage, and deterioration of the veneer itself. Caulking also contributes to the overall aesthetic appeal, creating a clean and finished look. The type of caulk used should be specifically designed for exterior applications and be compatible with both the stone and the substrate.
Our “Stone Veneer Siding Installation A Comprehensive Guide” details everything from material selection to final finishing. Understanding the intricacies of this process, much like grasping the advancements in game technology, requires careful planning and attention to detail. For a glimpse into the future of visual fidelity, check out this article on future game graphics technologies slated for 2025 , then return to our guide to complete your exterior renovation project successfully.
Caulk Selection and Application, Stone Veneer Siding Installation A Comprehensive Guide
Choosing the right caulk is paramount. Exterior-grade, paintable silicone caulk is a common and reliable choice, offering excellent adhesion and weather resistance. Apply the caulk using a caulking gun, ensuring a smooth, consistent bead. Avoid overfilling the joints, as this can lead to cracking and an unprofessional appearance. Tool the caulk immediately after application using a wet finger or a caulking tool to create a neat, finished look.
Allow the caulk to cure completely according to the manufacturer’s instructions before painting. Different caulks have different curing times, so it’s vital to adhere to these instructions to ensure proper adhesion and durability.
Creating a Professional Finish
Achieving a professional finish involves attention to detail in every aspect of the installation, from the initial layout to the final caulking. Consistent mortar joints, properly aligned stones, and neatly applied caulk all contribute to a high-quality outcome. Consider using a matching grout or caulk color to minimize the visibility of the joints, creating a more seamless appearance.
For larger gaps, backer rod can be used to fill the space before caulking, ensuring efficient caulk usage and preventing excessive material from being needed. Regularly inspect your work for inconsistencies, addressing any issues promptly.
Post-Installation Cleanup
Cleaning up after stone veneer installation is crucial for maintaining a clean worksite and ensuring the longevity of the installed veneer. Remove any excess mortar or caulk immediately using a damp sponge or cloth. Avoid letting these materials dry, as they become much harder to remove. For larger spills or dried mortar, a wire brush or specialized mortar remover may be necessary.
Dispose of waste materials properly, following local regulations. Protect the newly installed veneer from damage during the cleanup process, using caution when handling tools and cleaning supplies. A final sweep and inspection of the area will ensure a clean and professional finish to the project.
Maintenance and Repair
Stone veneer siding, while durable, requires regular maintenance to preserve its beauty and longevity. Neglecting maintenance can lead to costly repairs down the line, so establishing a routine care plan is crucial. This section details essential maintenance tasks and common problems, equipping you to keep your stone veneer looking its best for years to come.Proper maintenance involves regular cleaning, inspection, and prompt addressing of any issues.
This proactive approach significantly extends the lifespan of your stone veneer and avoids more extensive, and expensive, repairs later. Remember that the specific needs may vary slightly depending on your climate and the type of stone veneer used.
Regular Cleaning and Inspection
Regular cleaning removes dirt, grime, and other debris that can accumulate over time. This prevents staining and helps to identify potential problems early on. A thorough inspection should be conducted at least twice a year, focusing on areas prone to damage like corners and edges.
Common Problems and Solutions
Several issues can arise with stone veneer siding. These range from minor cosmetic concerns to more significant structural problems. Early detection and prompt action are key to preventing escalation.
| Problem | Cause | Solution | Prevention |
|---|---|---|---|
| Cracked or Chipped Stones | Impact damage, freeze-thaw cycles, settling foundation | Repair or replace damaged stones using mortar matching the original. | Regular inspections, careful handling of landscaping equipment near the siding. |
| Efflorescence (White Powdery Deposits) | Water soluble salts migrating to the surface | Clean with a solution of water and a mild detergent, followed by rinsing. | Proper flashing and drainage to prevent water penetration. |
| Loose or Missing Mortar | Weathering, settling, or poor initial installation | Repoint the mortar using a matching type. | Regular inspections and prompt attention to any loose mortar. |
| Mold or Mildew Growth | Moisture accumulation, lack of ventilation | Clean with a solution of water and a mild bleach solution (follow manufacturer’s instructions). | Ensure proper ventilation behind the veneer and address any water leaks promptly. |
Maintenance Schedule
A regular maintenance schedule ensures your stone veneer siding remains in top condition. This schedule provides a guideline; adjust the frequency based on your specific climate and conditions.
| Task | Frequency | Tools Needed | Description |
|---|---|---|---|
| Inspection for damage | Twice yearly (Spring and Fall) | Binoculars, ladder (if needed) | Visually inspect the entire surface for cracks, chips, loose stones, or mortar. |
| Cleaning | Annually or as needed | Garden hose, soft-bristled brush, mild detergent | Gently wash the veneer with water and a mild detergent, rinsing thoroughly. |
| Mortar Repair | As needed | Mortar, trowel, pointing tool | Repair any loose or missing mortar, ensuring a tight seal. |
| Caulk Inspection and Repair | Annually | Caulk gun, caulk (matching existing), putty knife | Inspect and reapply caulk around windows, doors, and other penetrations as needed. |
Cost Considerations
The cost of installing stone veneer siding is a significant factor to consider before embarking on this home improvement project. Several variables contribute to the overall expense, making accurate budgeting crucial for a successful outcome. Understanding these cost components will empower you to make informed decisions and manage your project effectively.
The total cost is a composite of material costs, labor charges, and necessary permits. The price fluctuates based on factors such as the type of stone veneer chosen, the project’s size and complexity, regional labor rates, and the prevalence of local regulations.
Cost Breakdown of Stone Veneer Siding Installation
The following table provides a general estimate of the cost breakdown for a typical stone veneer siding installation project. These figures are approximations and should be considered a starting point for your own budgeting. Actual costs may vary significantly based on the specifics of your project.
Stone veneer siding installation, as detailed in our comprehensive guide, requires careful planning and execution. Understanding the intricacies of this process is crucial, much like comprehending the rapid technological advancements in other fields, such as the evolution of wearable devices, as seen in this insightful article on their development: Perkembangan wearable devices. Returning to our siding guide, remember proper ventilation is key for long-term durability.
| Cost Item | Estimated Cost | Percentage of Total Cost | Notes |
|---|---|---|---|
| Materials (Stone Veneer, Mortar, etc.) | $8 – $20 per square foot | 40-50% | Cost varies greatly depending on stone type, quality, and supplier. Higher-end stones like natural cut stone will be significantly more expensive than manufactured alternatives. |
| Labor | $5 – $15 per square foot | 30-40% | Labor costs depend on the project’s complexity, the installer’s experience, and local wage rates. Intricate designs and difficult installations will increase labor costs. |
| Permits and Inspections | $500 – $2000 | 5-10% | Permitting fees vary widely by location and the scope of the project. Inspections may be required at various stages of the installation. |
| Preparation and Cleanup | $500 – $1500 | 5-10% | This includes costs associated with preparing the surface for installation, waste removal, and site cleanup. |
| Contingency (Unexpected Costs) | 10-15% of total estimated cost | 10-15% | It’s crucial to include a contingency fund to cover unforeseen expenses that may arise during the project. |
Factors Influencing Project Cost
Several factors significantly impact the final cost of a stone veneer siding installation. Accurate cost estimation requires careful consideration of these variables.
The type of stone veneer selected is a major cost driver. Natural stone, such as granite or slate, is typically more expensive than manufactured stone veneer. The size and complexity of the project also play a crucial role. Larger projects naturally require more materials and labor, increasing the overall cost. Regional variations in labor rates and material availability can significantly influence the final price.
Finally, the condition of the existing wall surface will influence the amount of preparation work needed, impacting labor and material costs.
Long-Term Cost-Effectiveness Compared to Other Siding Options
Stone veneer siding offers several long-term advantages compared to other siding options, although the initial investment is higher. Its durability and longevity reduce the need for frequent repairs and replacements, offsetting the higher upfront cost over time. Moreover, stone veneer adds significant curb appeal, potentially increasing the property’s value. Comparing the lifespan and maintenance requirements of stone veneer with alternatives like vinyl, wood, or fiber cement siding reveals that while the initial cost might be greater, the long-term cost-effectiveness of stone veneer can be substantial, especially when factoring in potential increases in property value.
Visual Examples and Descriptions: Stone Veneer Siding Installation A Comprehensive Guide
Visual aids are crucial for understanding the transformative effect of stone veneer siding. Seeing examples of completed projects helps homeowners envision the potential of their own homes and choose the best materials and styles for their unique aesthetic preferences. The following examples illustrate the beauty and versatility of stone veneer.
A Lakeside Cottage with Newly Installed Stone Veneer Siding
Imagine a charming lakeside cottage, nestled amongst towering pines. The previously plain, cream-colored clapboard siding has been replaced with a stunning blend of warm, earthy-toned stone veneer. The stone itself is a mix of light and dark browns, with flecks of grey and beige, reminiscent of a natural fieldstone. The layout is a running bond pattern, creating a sense of horizontal movement and visual interest.
The stones are carefully chosen to vary in size and shape, avoiding a monotonous look. The overall effect is one of rustic elegance, perfectly complementing the natural beauty of the surrounding landscape. The warm tones of the stone perfectly complement the deep green of the pines and the sparkling blue of the lake, creating a harmonious and inviting scene.
The subtle variations in the stone’s color and texture add depth and character to the cottage’s facade, making it a picturesque focal point.
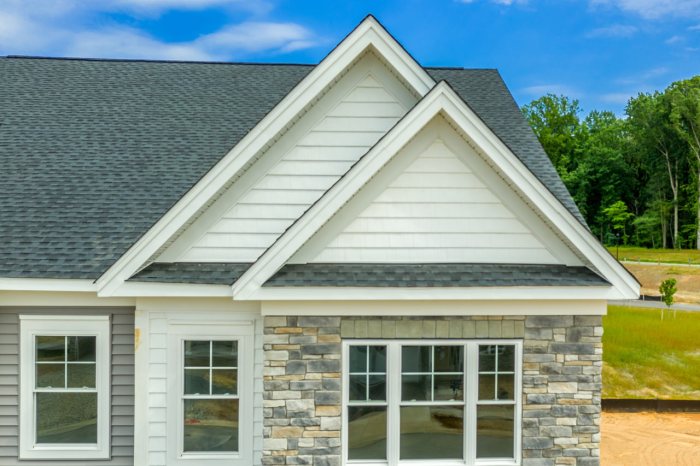
Before-and-After: A Suburban Ranch Home Transformation
Before the installation, a standard suburban ranch house presented a somewhat bland exterior. Its beige vinyl siding was unremarkable, and the home lacked a distinct architectural character. After the installation of a light grey, stacked stone veneer, the home’s appearance was dramatically altered. The clean lines of the stacked stone give a modern and sophisticated feel, while the light grey color complements the existing roof and landscaping.
The before-and-after comparison highlights the transformation: from a visually uninspired home to one that exudes contemporary elegance. The new stone veneer not only improved the home’s aesthetics but also increased its curb appeal and market value. The previously monotonous façade now boasts a textural richness that draws the eye and elevates the home’s overall presence.
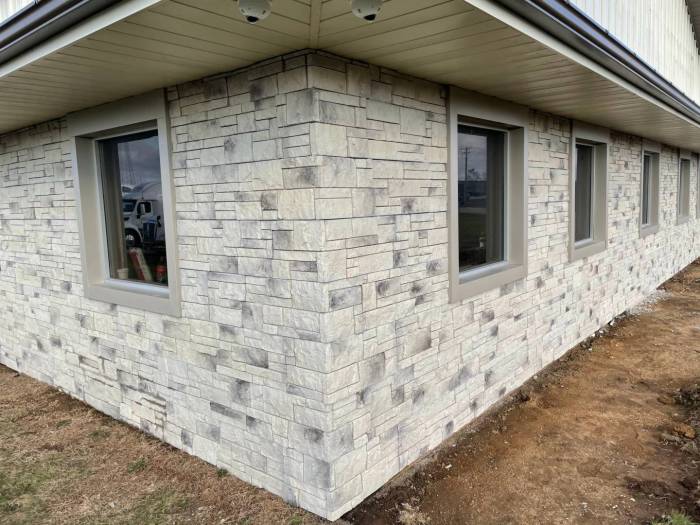
Close-up View of Stone Veneer Texture and Installation
A close-up reveals the intricate details of the stone veneer. The chosen stone is a blend of creamy beige and soft brown tones, with subtle hints of grey throughout. The texture is remarkably varied, with some stones exhibiting a rough, almost chipped surface, while others are smoother, with delicate veining. The installation is meticulous, with minimal grout lines visible, and each stone carefully placed to create a natural-looking, flowing pattern.
The subtle color variations within the stones themselves prevent any monotony, creating a dynamic and visually appealing surface. Individual stones show slight variations in thickness, further contributing to the realistic and organic appearance of the finished product. The precise fitting of the stones demonstrates skilled craftsmanship, and the minimal mortar lines maintain the natural look of the stone.
Ultimate Conclusion
Transforming your home’s exterior with stone veneer siding offers a blend of timeless elegance and lasting durability. This comprehensive guide has equipped you with the knowledge and practical steps to successfully complete this rewarding project. From careful planning and precise installation to meticulous finishing and ongoing maintenance, attention to detail ensures a beautiful and long-lasting result. Remember to always prioritize safety and consult with professionals when needed, especially for complex tasks or if you lack experience.
The end result – a stunning home exterior that reflects your personal style and adds significant value – is well worth the effort.
FAQ Resource
What types of stone are best suited for veneer siding?
Many stone types work well, including slate, granite, limestone, and quartzite. The best choice depends on your budget, desired aesthetic, and climate.
How long does stone veneer siding typically last?
With proper installation and maintenance, stone veneer siding can last for decades, often outlasting other siding materials.
Can I install stone veneer siding myself, or should I hire a professional?
While DIY is possible for simpler projects, professional installation is often recommended, especially for larger or more complex projects to ensure proper techniques and longevity.
How do I clean stone veneer siding?
Regular cleaning with a soft brush and mild detergent is sufficient. Avoid harsh chemicals or high-pressure washers.
What are the common signs of damage to stone veneer siding?
Cracking, loose stones, and efflorescence (white powdery deposits) are common signs of damage that require attention.

